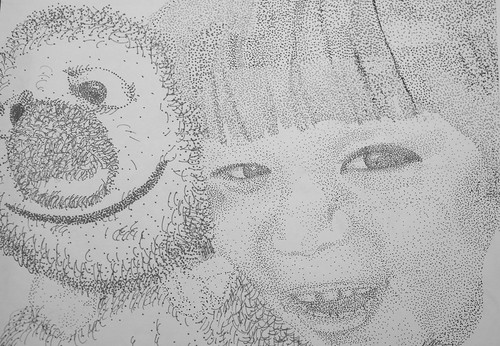
(I have used this picture in 365JE before to illustrate the need to buy waterproof archival pens in the blog post "I bought a pen today" but thought I'd use it here to show how easy this technique is for anyone to do.)
First, let me say that this is my first ever portrait and it was my first attempt at a stippled drawing. All of this says that you can do it too, even if you have never tried it. Believe me when I tell you that it is a very relaxing way to draw.
Next, let me tell you that I have had no formal art education. I didn't take drawing or portraiture in a college or a university, I did not attend art classes beyond high school. (Can't you tell?) All of what you see on the blog is self taught. (Maybe I have read a few art books, but then again, hasn't everyone?)
What all of this means is that you can do this too. I'll show you how simple it is.
Here's what you'll need:
1) a copy of a favorite photo (can be a person, a scene, an object, whatever)
2) a ruler
3) acid free drawing paper
4) pencil
5) felt-tipped, water-proof archival pen (Pitt or Micron work well)
6) kneaded eraser
Steps:
1) Using the copy of your photo (assuming it is a 4x6 photo) and a pencil, lightly draw a grid pattern of 1/2 inch squares over the entire photo.
2) Now draw a pencil grid LIGHTLY over your drawing paper. If your drawing paper is twice the size of the photo make the squares 1 inch or so. If you want to make a drawing of exactly the same size, use 1/2 inch squares.
3) Now simply "draw" using only dots (stippling) with the felt tipped pen.
4) Let the ink fully dry before lightly erasing the pencil lines. You should use an kneaded eraser so as to not disturb the inked dots.
Tips:
1) Focus and copy each square while ignoring the whole picture.
2) Follow the contour of the object your are stippling. For example, notice in my drawing of Eric's hair that I followed the contour of his head as I made my dots downward.
3) You can "block" the basic patterns of the object using pencil but it's not necessary. Some artists like to do a rough sketch over the squares but I think this defeats the purpose. You don't want to see the whole. In fact, cover the other squares with a paper and only focus on one square at a time.
4) The reason why you'll want to use a felt-tipped pen for this is because it is easier to make your marks. You can experiment with holding the pen longer in one spot to give bigger dots but there is a better way: Just add more dots for a deeper or darker area. The beauty of this technique is that you can go back and add more dots to areas that needs to be darker later. After you have done the entire drawing, look it over and note where you can add contour to the face or objects but adding dots.
5) Always pause and hold the drawing at arms length, or better yet, stand up and look at the sketch from afar. Cross your eyes and see only the shadows. Add more contour (dots) as needed.
6) Listen to some music while dotting your sketch. As the drawing comes together you'll lose track of time. This is the most relaxing period of your session.
7) Warning: You will become giddy with excitement as the sketch comes together but . . . take it slow.
When you are finished, add some words around your sketch to frame your drawing. Both words and sketches add depth to your journaling experience.
Happy sketching.
...dave
Drawing is taking a line for a walk. -Paul Klee
0 comments:
Post a Comment